Arcade:
From 2007 to Spring 2009 I constructed an arcade unit with the help of my father and my friend Pat. It has two revisions to the physical machine done. The actual machine is a computer running Ubuntu linux.
Software:
The front end is wah!cade and it starts the following emulators using XML listings of the games. It has the following systems enabled for play:
- Atari 2600 (MESS)
- Atari 5200 (MESS)
- Atari 7800 (MESS)
- Atari Jaguar (Virtual Jaguar)
- Atari Lynx (MESS)
- Sega Master System (GENS)
- Sega Genesis (GENS)
- Sega 32x (GENS)
- Sega CD (GENS)
- Sega Game Gear (MESS/GENS)
- Nintendo Entertainment System (FCEU)
- SNES (snes9x)
- N64 (MUPEN64 w/ libstc++5)
- Virtual Boy (Reality Boy / WINE)
- Arcade Games (sdlmame)
Other software needed:
IPAC-UTILS - used to program the keyboard controller
IPAC-GUI - gui used to ease programming of keyboard controller
Thoughts when doing software setup:
- Find the least configurable emulator and start your keymap there. If you configure all your emulators the change you only need to set the key mapping once.
- It's probably easier to get the emulators working on windows. It seems their are more supported versions. I didn't want to maintain a windows box.
- Have your machine network connected. It makes updating and transferring odd files you may need easier.
- SDLMame is picky. If your game doesn't work on the current version try to revert a few. I really wanted to play Radiant silvergun and Gauntlet Legends. They don't run that well on the latest version.
Hardware:
- AMD Athlon x2 4000+
- 2 Gigs of Memory
- 500 gig hard disk
- Nvidia Geforce 5800 on-board video card
- iPAC 4 - 4 player joystick->keyboard usb controller (Ultimarc.com)
- 30" Westinghouse LCD (2005ish?)
- Joysticks and buttons. Bought 2, 2 player kits and had some buttons left over (Xgaming.com)
- USB rollerball/trackball (Xgaming.com)
- 802.11G Wireless PCI card
- Cables - usb, keyboard, ethernet, video, audio (Monoprice.com)
- Piano Hinge - used to mount door
- MDF fiberboard
- Plexiglass
- Cold Cathode Tube lights x2
- 4 Pin power to wall adapter for lights
- Arcade Marquee (MameMarquees.com)
- T-molding (tmolding.com?)
- Slot cutter routing bit and shank (tmolding.com?)
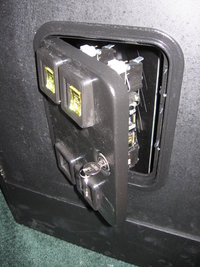
- 2 slot coin door (Happ Controls)
- Wire for buttons/joysticks
- Female spade connectors for buttons/joysticks.
- Rustoleum Semi-Glass black paint.
Thoughts when doing hardware setup:
- Put ports for TV on the back of the unit, I end up using mine for games when friends come over also. Reason #1 for 2nd build
- Make sure the monitor height is comfortable. I had to raise mine
- Install an ethernet jack in the back. It's just easier when someone wants to steal the connection for games.
- Install a wireless card and do away with ethernet.
The plan:
Original Budget: $1000 (using old LCD TV)
Actual Cost: ~$1600 (using old LCD TV)
Time: At least 500 man hours
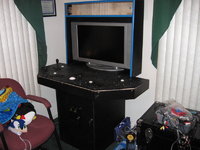
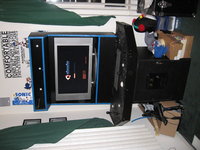
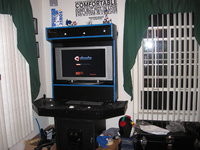
My goal was to create the machine so that it would fit in with my home decor and allow comfortable playing of 4 player games. Specifically I wanted to be able to play Gauntlet Legends and TMNT: Arcade with 4 people. If possible I wanted to play GoldenTee Golf which requires a track ball. I wanted working coin slots and possibly use of my existing LCD tv.
Before you read any further, stop and think about when you will actually use the machine. I got caught up in the excitement, built it and now it sits in my living room with use 2-3 times a year for 2 hours at a time. If that is okay with you, continue.
How to assemble:
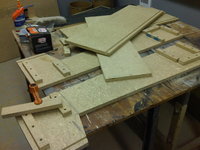
I built my unit in 3 pieces so that it is easy to assemble, disassemble and move. In general try to creatively hide all joints and screw holes. This often results in things being screwed through supports from the inside. It is in your best interest to predrill all holes when working with MDF as it tends to crack under pressure.
Tools:
- Hole saws
- Table saw
- Drill
- Router
- Slot Cutter Routing bit - Yes you really do need this and the shank for it to go on. No you can't fake it with a saw. I tried, suck it up and spend the 30 bucks. It will save you so much time and effort.
- Screwdrivers
- Wood glue
- lots of clamps.
- Paintbrush/Roller
- Brad Nailer / Air Nailer (not needed but makes it easy.)
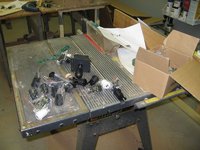
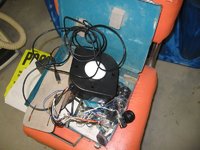
Control board:
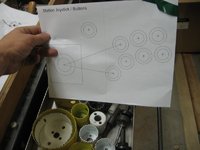
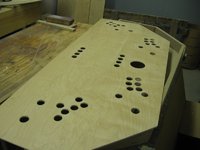
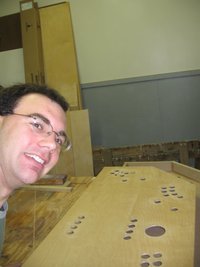
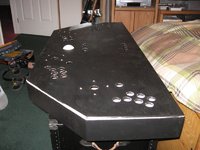
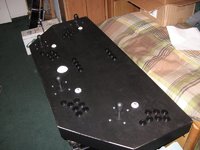
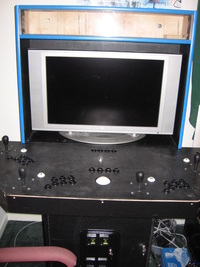
Unpack your controller parts and figure out how to wish to configure them on the control panel. I highly recommend searching online for a template. I used one that was reproduced from a capcom machine. It has 7 buttons per player and a start button. I recessed a button for each player into the bottom of the control panel to add free coins. The rest of the buttons I placed at the top of the board to use for features like escape, control, alt, enter in the emulators.
If you are using a trackball consider the amount of swing your arm will have when hitting it. If you are too close to the monitor your hand will go right into it. Figure on giving yourself more than 2 feet of room.
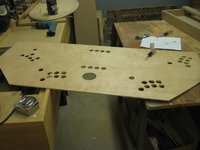
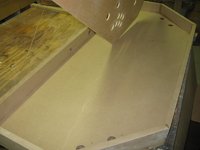
Use MDF to contruct the base of the board and use thin 1/4 plywood for the top. Install wooden supports to handle pressure to the top of the control panel. People will lean on it. 1/4 is not strong enough to support that.
Once your base is done and template is made, break out the hole saw. Cut a hole for each button and joystick into the top. Install all buttons and joysticks without the switches. Ensure that the top part will fit in the base with room for the joysticks to move. I had to shave inunder mine because it brushed the bottom when I pushed left or right.
Create trim to go around the board and hold the top down. If your top sets in and overlaps (as many do) the trim is not necessary. I made mine so that the top was fastened to the bottom by the trim.
Remove all control pieces, paint and then re-install when dry.
Once fitment is assured install the iPAC into the control panel. Next begin wiring. I highly suggest buying daisy chained wires for ground wires from one of the arcade sites. I abused Ethernet cabling we had around the house and ran 2 ethernet cables from the iPAC to each player area. It takes 4 wires for the joystick, and 8 for buttons plus 1 per coin button. The ground you can build a large daisy chain to go to each microswitch. I found it easiest for wiring and debugging purposes if each player area had it's own ground wire daisy chain.
For the coin slots I connected one individual button to each player and then connected a long lead out the back which connected player 1 and 2 to the first actual coin slot. This enables you to feed the machine quarters or press a button.
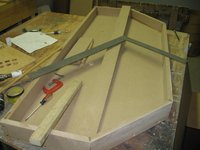
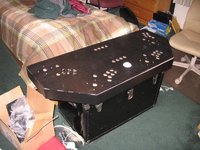
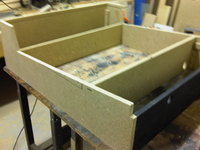
Base:
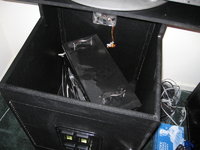
The base of the arcade is a large box. Construct it from MDF. It needs to fit your computer, coin acceptor and optional shelving. The box needs a door up front to install the computer and work on it. Run the router with slot cutter bit down the front anywhere you would like T-Molding to go.
It also needs ventilation. I suggest a 240mm computer fan on the back. Extensions for fan wire can be bought at monoprice so you can start the case fan off the PC. Install a power strip for the monitor, pc and lighting. Next cut a hole for all cords to pass through. Consider also that the cords from the back of the control panel need to be routed down into it. In my case, the back of the box actually comes up to form a support for the top.
Paint.
Install the coin door and attach the long wires from the iPAC for the coin slots.
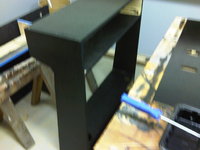
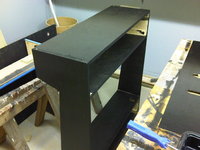
Top/Head:
The head of my unit is a housing for the LCD monitor, jacks for the LCD monitor and lighting. Optionally you may want to add speakers but my TV already had them so I didn't worry about that. The top's design is really up to you, just make sure the monitor support is high enough. My second revision adds about 8 inches of heigth to the monitor and it makes a huge difference in player comfort.
Again run the slot cutter around all edges of the top you wish to have t-Molding.
For the back of mine I used 1/4 plywood again and used the brad nailer to tack it to the sides. When painted it looks very nice.
Figure out where you wish to have the marquee and use the table saw lowered to cut a wide slot which you can sandwhich two pieces of plexi with your marquee between.
Cut your plexi to fit in the slots on top, bottom and sides. Leave the protective plastic on while working with it.
Paint.
Final:
Assemble all three pieces, install computer and have fun/leave sitting in corner unused :)
Future plans:
- Bar Stools x 4
- LCD TopGun 2 for light gun games
- Faster CPU
Photos (Hover for caption):